TurbinePreview — quick start. Version 1,
2026-07-26 · the web version (works on a desktop browser and on your
phone)
1. What this is
TurbinePreview draws the proposed Bookham wind turbines onto
your own photograph, in the right place and at the right size,
using public terrain data and the turbine positions and maximum tip
heights taken from the project's planning documents.
Stand somewhere that matters to you — your verandah, your gate, a road
you drive every day — take a photo of the view, and the app works out
which turbines would appear in that frame, how tall they would stand
against the ridge, and which ones the terrain hides completely.
It works best when hills and ridgelines — the skyline — are clearly
visible. Some foreground trees are OK, but not blocking everything.
Two things to be clear about from the start:
The images are computer-generated estimates, not
photographs of existing structures. They are
indicative.
The calculation knows about landform only. It
does not know about trees, sheds, houses or haze, so it will
sometimes show you a turbine that a stand of timber would actually
block.
There is nothing to install: it is a website (Android and iPhone apps
are coming soon). It runs on a desktop browser and on a phone, and it is
designed so that the part you do outdoors — taking and aligning a photo —
keeps working with no mobile signal at all.
Suggested order for your first go:
On your desktop computer, browse the captures other people
have already made around Bookham and get a feel for what
the tool is telling you.
Have a look at the same thing on your phone, and
add the page to your home screen (see below).
Then go outside and make a capture of your own —
that is the part we most want tested.
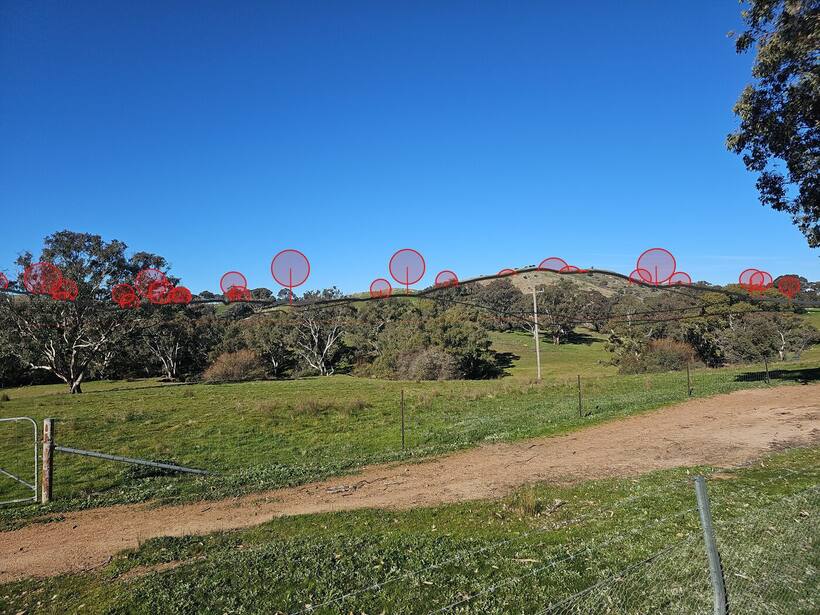
A real photo from a gate near Bookham, with the proposed
turbines drawn on. The thin dark line tracing the hills is the
computed skyline: when it sits on the real ridge in
your photo, the turbines are in the right place.
You'll be asked to accept the terms of use, and then to
verify your email address. The verification mail
comes from noreply@turbine-preview.au — check
your spam or junk folder, because a brand-new sending
domain often lands there the first time. Marking it "not spam"
helps everything later.
Follow the link in the mail, and you're in.
You can browse public captures without an account at all. You need one
to save your own captures to the server and to choose who can see
them.
Before you head out: load Bookham while you still have signal
This is the one step that makes the field work. Do it at home, on the
device you'll take outside:
In the Windfarm dropdown on the front page, choose
Bookham.
Open capture & align a photo (top of the
page).
The Bookham data package — the turbine layout plus the terrain
model for the area — downloads and is kept in the
browser. You'll see it listed under "Saved for offline
use" with its size and the date.
Open the site map once too, so its tiles are
cached.
Once that package is stored, the capture-and-align page works in a
paddock with no bars showing. Without it, it can't compute anything.
Add it to your phone's home screen
While you're still online, put the page on your home screen:
Android / Chrome: an Install app
button appears at the top of the capture & align page — or use
the browser menu ⋮ → Add to Home screen.
iPhone / Safari:Share →
Add to Home Screen.
Why bother:
It opens full screen, without the browser chrome
eating the top of your photo.
It starts up offline — a plain browser tab may
not.
On an iPhone it protects your work. Safari deletes
a website's local data after 7 days without a visit, and that
includes captures you've saved but not yet uploaded. Installed
home-screen apps are exempt, so installing is the
fix.
3. Browsing what's already there
The front page
Three sections, top to bottom: My photos (yours),
Shared photos (what other people have chosen to share,
plus everything public — visible even signed out), and
Windfarms (the catalog, with the proponent and project
links for each site).
The Windfarm dropdown at the top scopes the whole page
— set it to Bookham and stay there. Click any card to open that capture's
page.
A capture's page
You get the photo with its overlay, who took it, two maps, and the
numbers.
The line to learn to read is the visibility count, e.g.
4–55 turbines visible (44.91)
55 turbines would show something from
this spot — even a blade tip.
4 of them would show the whole rotor
circle, clear of the ridge.
44.91 is the total visible rotor area expressed as
whole turbines — the fairest single number when most turbines are
partly cut off by terrain. A single number like "55 visible"
flatters; this one doesn't.
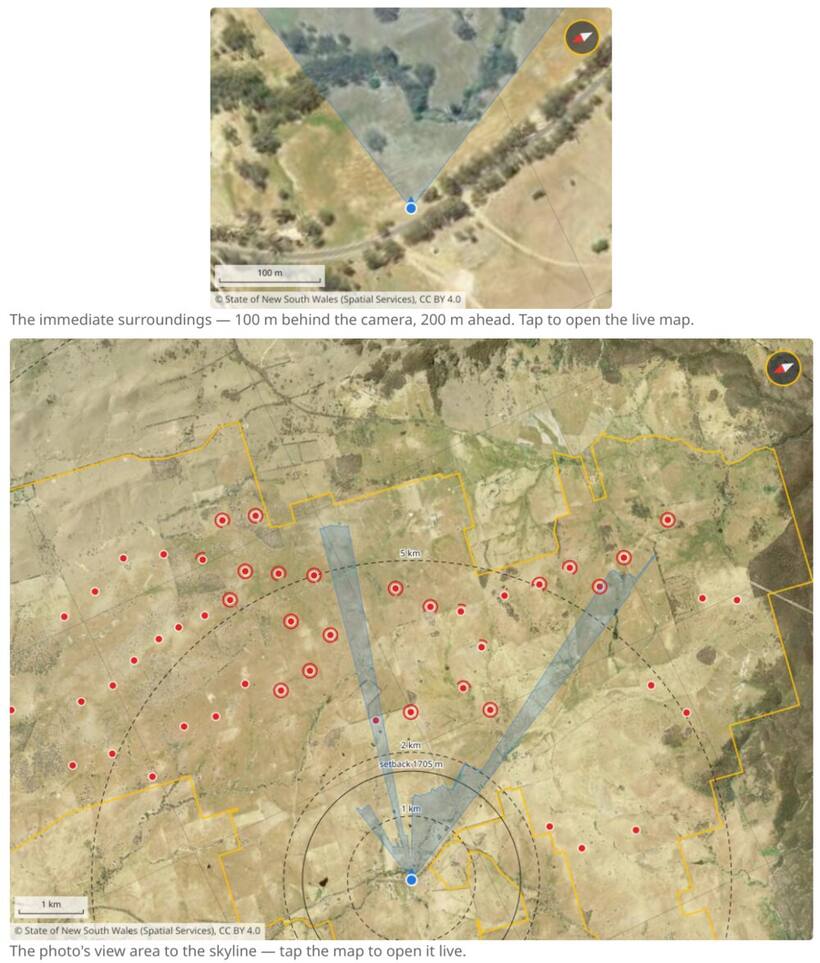
Below the photo are two maps: a close-up of the
surroundings (100 m behind you, 200 m ahead, rotated so
the photo's direction is "up") and the site map showing
the capture point and the view area out to the skyline. Tap either to open
the live map there.
The same capture as above. The pale blue fan on the site
map is what the photo actually covers, out to the skyline — the
gaps in it are where the land itself blocks the view.
The site map, and what the rings mean
On the map:
🔴 red dots — turbines.
🔵 blue markers — captures. Filled = aligned,
hollow = compass-only, dashed = waiting to upload. The wedge from a
marker is that photo's view area out to the
skyline.
🟢 green dot — you, if you press My
location (we only ever ask for your position when you
press it).
Red arc rings around turbines — the
important one. A ring is drawn around every turbine that
can be seen from the point the map is currently about, and
the length of the arc is how much of the rotor is
visible: a complete circle means the whole rotor clears
the terrain; a short arc means only a sliver of blade does.
Dashed circles at 1, 2, 5 and 10 km, a
scale bar in the corner, and a solid black
ring at the NSW guideline setback distance — inside that
ring, the guideline presumes a turbine is visually dominant.
Which way is up — the compass rose
When the map is showing one particular photo — you got there by tapping
a capture's map, or by opening a capture from the list — it opens
turned to match that photo instead of north-up, and a
small compass rose appears in the top corner. The red
needle always points north; the rose's ring is gold while the map
is turned and white when it is north-up.
Tap the rose to switch between the two, as often as you
like.
Turned-to-match is the one to use in the field:
standing where the photo was taken and facing the same way, the screen
lines up with what is in front of you — a ridge on the left of the map is
the ridge on your left. North-up is the better one at the desk, for
comparing against other maps and planning documents.
"What would I see from my place?"
You don't have to stand somewhere to ask about it. Long-press
anywhere on the map (press and hold — with a mouse too) and an
amber crosshair drops there. Everything then re-answers
itself for that point: the red rings recompute, and the status line under
the map reads the count for that exact spot, with a link to the photo list
nearest it.
Tap a turbine and you get its id and how far it
is from the marked point — the crosshair if you've placed one,
otherwise your position.
On farms whose package carries a wind model you also see an
indicative CF — a capacity factor. A turbine rated at,
say, 7 MW only produces that when the wind is strong enough; the
capacity factor is the share of a full-power year it is expected to
actually deliver, averaged over calm days, windy days and everything
between. 35% is a good figure for NSW wind; below about 25% is a
comparatively poor one. The two operating farms we check our
model against measure 29% and 34%; a low figure means the proponent
would earn noticeably less from the same machine, which is worth knowing
when you are weighing what a project is really offering its district.
It is indicative — modelled from public wind data with a stated
uncertainty band, not the proponent's own (unpublished) resource
assessment — and the farm's About page carries the full picture: the
farm-wide figure, the energy and income bands behind it, and where the
numbers come from.
Tap the crosshair to clear it and go back.
This is the feature to give a workout: drop it on your house, on the
neighbour's ridge… It is honest terrain arithmetic, and it is the fastest
way to find out whether a photo is worth a drive.
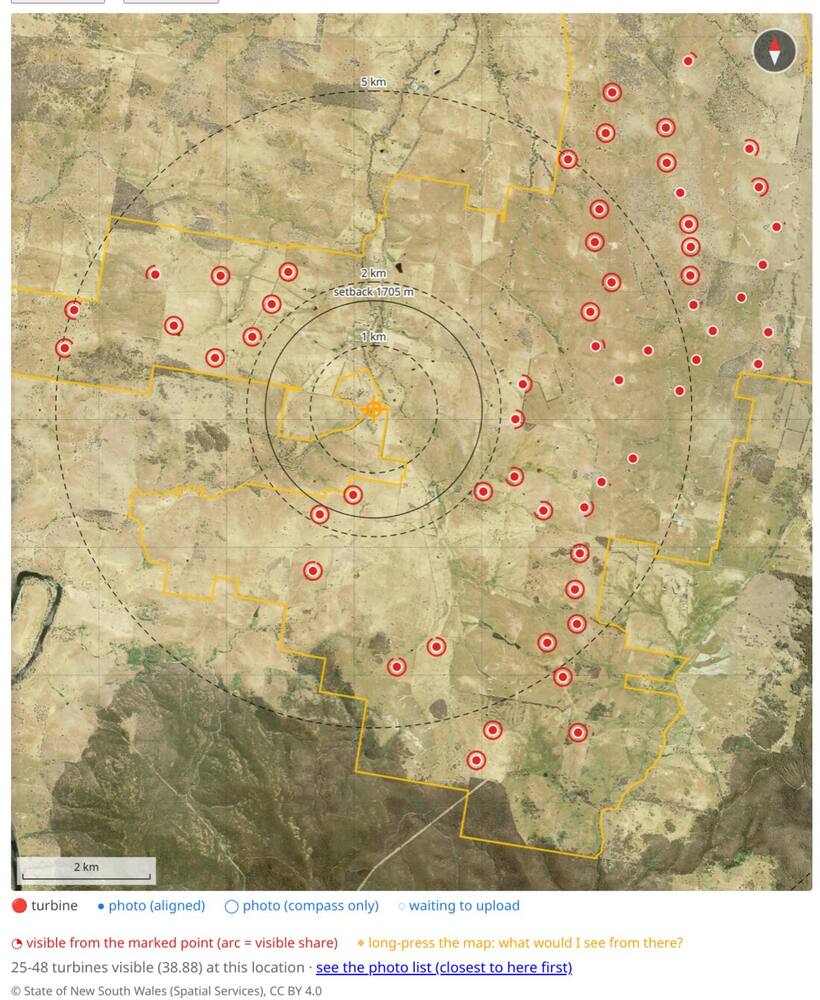
The crosshair has been dropped on a property west of the
layout. Every turbine that can be seen from it carries a red ring —
look closely and some are complete circles while others are short
arcs. The dashed circles are 1, 2 and 5 km; the solid black one is
the 1705 m setback. The line underneath answers the question:
25–48 turbines visible (38.88) at this
location.
Sharing and exporting
Sharing — each of your captures is one of:
Private — only you (and the site admins).
Shared — visible to people holding the roles you
tick (eg neighbours, turbine hosts).
Public — visible to anyone, including people
without an account.
Change it on the capture's page: the Change… button
next to the visibility line. Private comments and impact ratings you
record stay between you and the admins whatever you choose here.
Export — the Export… button builds a
single image to send to anyone, tick by tick:
the photo, with or without the overlay;
optionally the surroundings map and the
site map;
and, always, a caption block naming the site and
the counts, a QR code linking back to the
capture's page, and the disclaimer.
On a phone you also get Share image, which hands it
straight to Messages, email or WhatsApp. That exported image is the thing
to put in a submission or send to a neighbour — it carries its own
provenance.
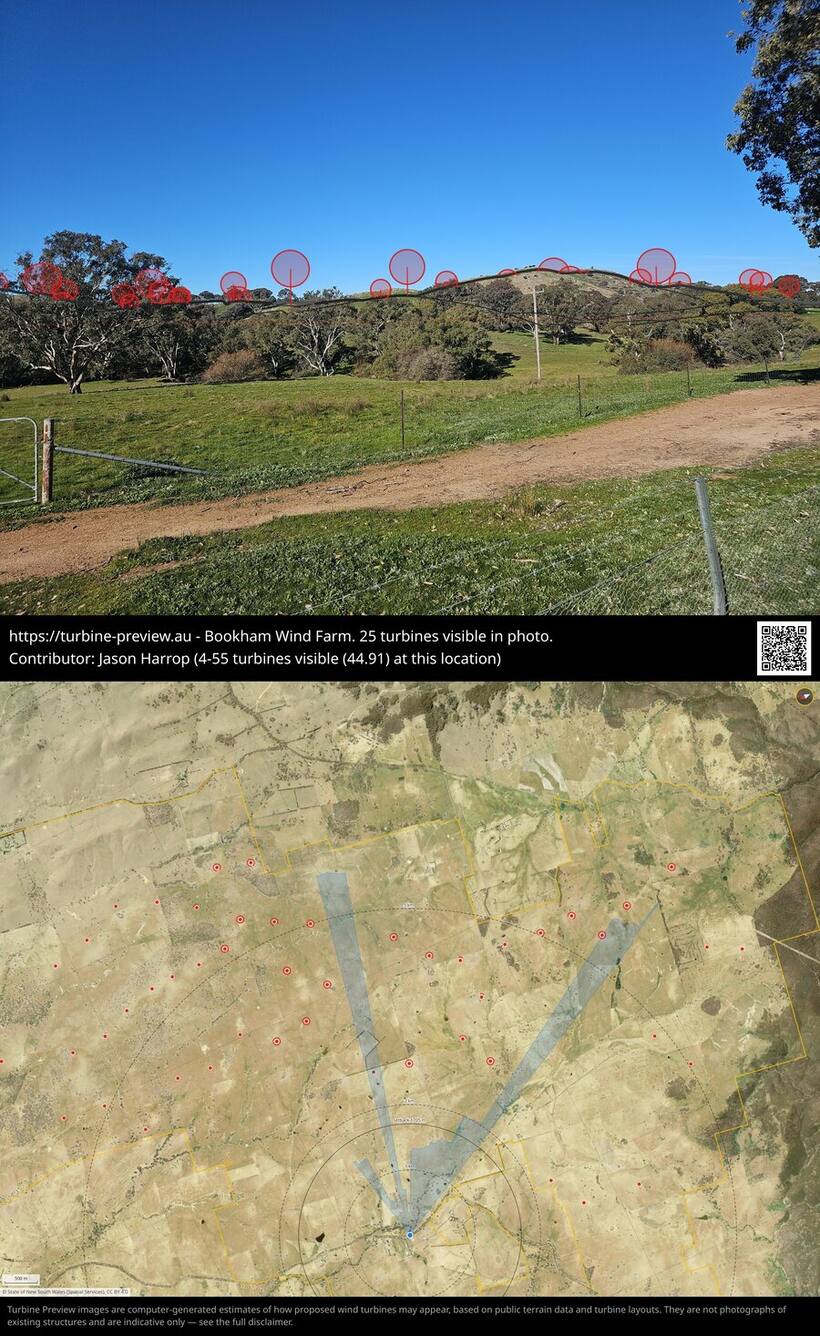
One exported file, ready to send: the photo, a caption
naming the site and the counts, a QR code that takes the reader
back to this capture's page, the site map showing where you stood
and what the photo covers, and the disclaimer.
Please don't share anything with Squadron yet! We'll let
you know as soon as we're ready for that.
4. Making your own capture
Pick a spot that matters, and:
Set the windfarm to Bookham on the front page,
then open capture & align a photo.
Take the photo. Two ways, and the choice matters:
Take photo here (the button on the page) —
uses the browser's camera. It records your position
automatically, which is what lets the overlay place
itself without guessing. Resolution may be lower than your
camera app's best.
Choose file — take it with your normal
camera app first, then pick it here. Best quality, and it
reads the location and compass heading from the photo's EXIF
if your camera app was allowed to record them.
(Worth checking that setting once, at home.)
Shoot landscape, hold still, and try to get some
ridge line in frame — the ridge is what the alignment locks
onto.
Align. The page draws the computed skyline and
turbines over your photo and tries to fit it automatically. Then
nudge it yourself:
drag — direction and tilt;
two fingers (or mouse wheel) — rotate and
zoom;
focal length slider — open it if the drawn
skyline is too wide or too narrow for the photo; some phones
don't report their lens honestly.
Reset starts the fit over.
Aim to get the drawn skyline sitting on the
photographed skyline. When those two agree, the turbines
are in the right place.
Save… — then fill in About this photo:
what kind of viewpoint it is, a public comment, a private comment
and impact rating (admins only), and field notes to the
developers — please use that box, it is read.
Save & upload finishes it.
If the automatic fit refuses ("only 0 clean skyline
columns" or similar), that's usually low sun, glow or haze washing out the
ridge. Nothing is lost: save it anyway and align it by
hand, then or later. Turning your phone slightly (new photo) to put the
glow further off to one side often fixes it.
If the camera preview stays black (iPhone, home-screen app)
On iPhones, the copy you added to your home screen can occasionally
open Take photo here to a black preview: the phone gets
into a state where it withholds the camera from installed web apps, even
though Safari itself is fine. The line under the preview will say what's
wrong. The remedy that has worked in the field is simply to
restart the phone, open the app again and accept the
camera permission when it asks. Nothing is blocked in the meantime:
Choose file still works (your camera app is unaffected),
and so does opening the same page in Safari.
5. Online, offline, and signing in
It is built to work in the field with no internet. With
the Bookham package saved, you can open the page, take a photo, align it
and save it with no signal at all.
Works offline: the capture & align page, the saved
Bookham layout and terrain, the alignment, saving, and the map inside the
align page.
Needs a connection: browsing photos on the server, the
windfarm catalog, signing in, and uploading.
You do not need to be logged in to capture. Save first,
identity later — that is deliberate. When you save:
Offline:"Saved. You're offline — it uploads
automatically when you're back online and signed in." The
capture sits in this browser's queue. You'll see it as a card in
the list marked waiting to upload, and as a dashed
marker on the map.
Signed out but online: the sign-in screen may
appear. Your capture has already been saved before that
happens — if you don't want to sign in standing in a
paddock, back out of the login screen and it stays safely
queued.
Next time you open the site online and signed in,
the queue drains by itself and your captures appear on the
server.
Two cautions about the queue:
Queued captures live in that browser on that
device. Don't clear site data / "browsing data" before
they've uploaded.
On an iPhone, install to the home screen
(§2) — otherwise Safari may bin them after 7 days
of not visiting.
6. Telling us how it went
This is a beta and you are the reason it will get better. Three ways,
best first:
Field notes on the capture itself — the Field
notes to the developers box, either when you save or later on
the capture's page. These travel with the capture, so we can look at
exactly what you were looking at. A note written at the spot is
worth three reconstructed from memory.
What's especially useful to include: what device and browser, a
screenshot, roughly when, where you were, and what you expected to happen
instead. If the overlay looked wrong — turbines in the wrong place,
or the wrong size — tell us, and leave the capture on the server so we can
look at it.